Showing posts with label DIY. Show all posts

Tuesday, July 2, 2013

DIY Fourth of July

I’m usually rather underwhelmed by the Fourth of July, but this year I’m feeling pretty patriotic. With the recent demise of DOMA and Prop 8, and Wendy Davis’ heroic—if  symbolic—stand against the Texas legislature’s disingenuous bill that undermines women’s right to choose in that state, I’ve got some topical new reasons to be proud to be an American. Additionally, we’re hosting a family Fourth of July party! Yay! 


There are certainly some challenges to hosting a cool Fourth of July party. For one, I don’t like too much red, white and blue as a color scheme. It’s also easy to foray into cheesy territory with patriotic decor. I wanted a more vintage “Americana” look than a “Yee-haw, America!” theme to my décor. A lot of these decorative crafts can be made by even the novice crafter/party planner and they have exponential atmosphere-enhancing effects—lots of Fourth of July bang for your crafting buck!   


I started simple. Using scrapbook paper and string, I strung together a bunch of triangle flags in red and white, or blue and white patterns. A hanging decoration of this sort adds a lot of jovial ambiance for a very tiny effort. I made a ton of these. Another simple construction paper background decoration is a set of paper ring chains. 


Next I dug out some white and red spray paint and added color to some of my many small Mason jars. I'll use them for plasticware or straws and whatnot. I might rough these up with some sandpaper to add a little old-timeyness to them. 


I also found an old Christmas basket, which I turned into a Fourth of July basket by painting the green stripe around it white-ish. I put boxes of sparklers in it. That’s a twofer: decorations that double as party favors! 


From there I upped the ante with some toilet paper and paper towel tube rockets. First I spray painted them red. I found some white ribbon and hot glued two pieces wrapping around the longer one. For the other I busted out my stamping supplies and cut out star stamps to decorate the tube. It was moderately successful, but I liked how it turned out looking sponge-painted and a bit rustic. For the tops I cut circles from colored paper, made a slit, folded them into cones and glued them in place. Then I hot glued them to the rocket body. I stuffed the tubes with newspaper and then shoved a bamboo skewer in the center, and I even went so far as to hot glue a little piece of string up there for the faux fuse. Authenticity.   


As you can see, these are very lifelike and pretty cool looking rockets. 


Before you think, “Wow, you really go overboard with the party decorations,” allow me to share with you one of my top rules of party planning: a barren partyscape is a fun desert (As in, there's no fun as far as the eye can see. You might think you see an oasis of fun around the punch bowl, but no, it's a mirage!).  Without some touches of festivity, it’s just a random gathering at your house. Boring! Decorations make it a party. They tell your guests, “Hey, this didn’t happen by accident! You came here to party and I have MADE FOR YOU A PARTY!"  

And there's a lot more where these came from, so rev up your party engine and stay tuned for the next installment of my DIY Fourth of July!   

Friday, June 14, 2013

Romper Lust

I have a thing with rompers. I really love them. They're everything a clothing item should be in the summertime--playful, minimal, slightly ridiculous. You can do a cartwheel in them. Unless, like me, you can't actually do a cartwheel without damaging your fragile 27-year-old wrists. In that case, don't even try. Instead, get yourself a romper, then throw a backyard barbecue to celebrate said romper and be the most appropriately dressed person at the event! If you have friends with young children attending your barbecue, be prepared to be out-rompered and out-sassed by those tots. That's OK. You can shine while sharing the spotlight. The little bitches. 

My romper love runs so deep that yesterday I actually went into a store and had a perfect romper put on hold so I could retrieve it after depositing my paycheck today. Then I went home and made myself a romper out of a frumpy thrift store dress. Then I still went back to the store today to buy the initial romper. 

Say "romper" again.

This is what I started with: an oversized 90s-ish frock made from a pretty turquoise material in that airy, slightly see-through fabric that I imagine an older woman who wears slips might wear regularly. 
Unfortunately I didn't take many photos of my process with the romper, because I felt like it might not come out and I didn't want to jinx it. Basically I cut the top and skirt apart from each other, then took in the top and cut off the sleeves. For the bottom, I used a pair of my shorts folded in half as a pattern to make two halves of the shorts, but I made them longer and flowier than the pattern shorts. Then I sewed together the two crotch parts--that part that sticks out when you fold a pair of shorts in half. From there it was easy to see where to sew up the butt and frontal seams. I messed up and sewed the last seam backwards, had to rip it out and then re-sew it. Learning!


I also sewed a sash piece in the waist because I thought the top was too short initially. Then I just sewed them together. Voila, romper!


This cat Ollie is an important part of my creative process and, as this photo makes clear, she loves me very much with all her kitty heart. 


If my penchant for sewing myself rompers and anthropomorphizing my cat's feelings didn't already clue you in to my special brand of badassery, then this final photo definitely will. I loved the weird button situation on top of the dress, but the white collar and everything made it look too "buttoned up" for my taste. Luckily, all those unnecessary buttons gave me plenty of options for buttoning the top wide open to then wear over a white camisole. 

Tuesday, January 29, 2013

Fancy Pillowcase Tutorial by the Remnant Bin Queen

Lately when I've been making my trips to JoAnn's, I've become obsessed with rifling through the remnant bins. Recently there was a half-off remnant sale, and I went crazy! Instead of thinking of myself as a crazy bag lady clutching many multicolored scraps of fabric, I fancy myself a Remnant Bin Queen, the benevolent ruler over these lost fabric souls! Recently I found a remnant in a nice blue and white floral-ish design  that seemed to vaguely match my color scheme for my craft room. I decided it would be perfect for my craft room's mismatched-but-color-coordinating throw pillows, which is a design aspect recommended in the "creative" color scheme paint pamphlet. 

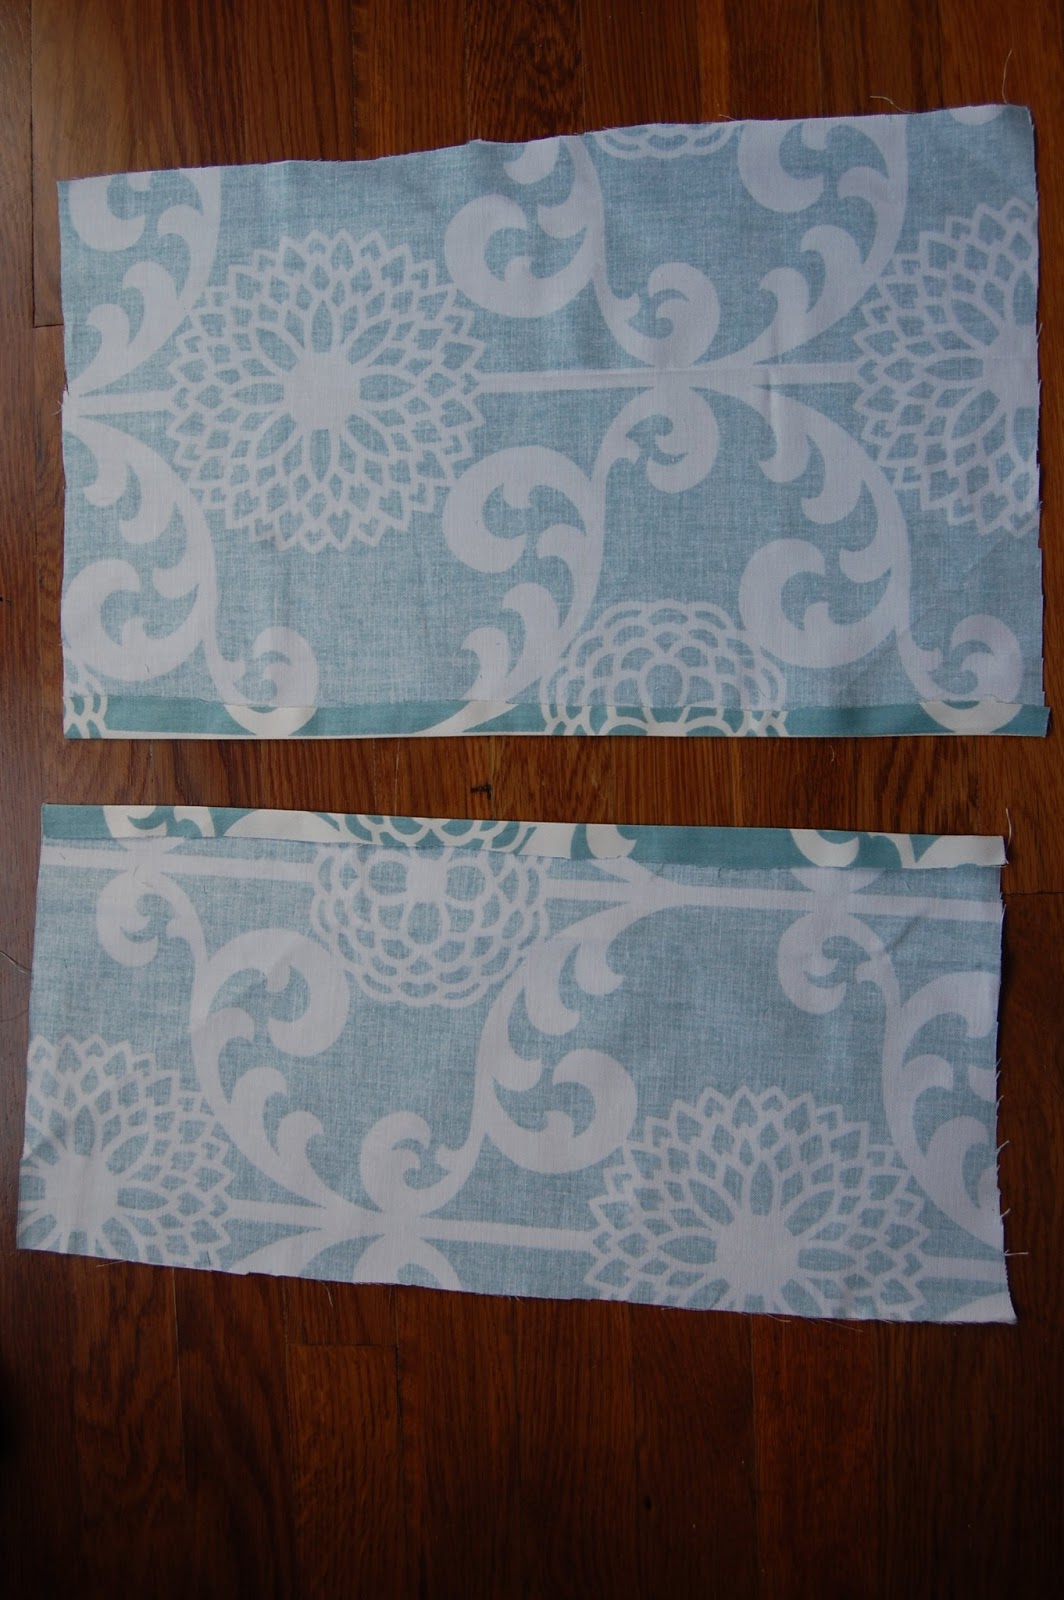
I've made several simple pillowcases with one front piece and two overlapping back pieces, but I wanted this one to be a little different. I had extra fabric, so I figured I would add some design or texture element to the front. I started out in the usual fashion, with my three pieces: the front, and two overlapping back strips. I sewed in the edges on the back two pieces, like so.  

I decided to do a twisty piece on the front, like a big piece of farfalle pasta. I cut a strip that was almost as wide as the front piece, and several inches longer. I sewed the edges of that long piece so there weren't raw edges. I centered the longer piece on top of the front square piece and folded one edge over it, with both front faces up. Here is the front and back view.

Then I ironed everything. I took that long piece and twisted it twice, so that it made a farfalle (butterfly) shape with both wings having the right face out, and arranged it so there was no back part showing. I sewed the other edge over the front square to secure it. 
I wanted there to be a little piece in the middle of the butterfly, securing it, or giving it the illusion of security anyway. I made a little piece and sewed the edges, and then I lifted the butterfly off of the front piece and sewed it into place with two small folds on the band. You can kind of see how I did it here. 
Now it was time to sew the back pieces on. I made sure the right facing sides were together and sewed them on. One thing I've noticed about my pillows is that I make the corners too pointy, so I tried to soften them in this instance, and I even cut little notches into them because that's supposed to make curves not appear rumpled. I also used pins to pin the back pieces into place, which would make my mother proud (not pictured...). 
Notches, bitches. 
Alright, so I pinned, notched, twisted and sewed. Now I have a pillowcase that's a step above the other ones I've made. Boom!  

Just look at that light dappled pillow. It is beautiful. Here it is with its friends! 
Now doesn't that IKEA sofa bed pillow spread just look...fit for a Queen!
YES!  


Monday, January 21, 2013

Shirt Sewing Success


This year, instead of listing a small but manageable crop of resolutions for the new year, I’ve been scrawling a random assortment of goals and things to remember this year in my journal. The running list consists of such lofty and specific goals as “read more,” and “be kinder.” Somewhere on the margins I scratched “get better at sewing,” and I thought a good way to do that would be making myself some more clothes. 

Now I've done some sloppy-chic clothes sewing projects in the past, but I wanted to refine my technique. This year, I decided, I’d learn to use patterns, starting with a new pencil skirt for the office! I went with the Simplicity brand patterns, thinking (as I’m sure the Simplicity marketing team intended) that these patterns would be very easy. Turns out, it’s like that Minute rice that takes much longer than a minute to cook. I picked out a nice brown crackle pattern fabric, grabbed the various accoutrements (zipper, hook and eye, measuring tape, dressmaker’s pencil!), and as I was heading to the cutting table, a sheer, black and white remnant caught my eye so I grabbed that as well, as it was only $4.

I got home and excitedly ripped open my pattern. It was complete gobbledy gook. I abandoned it and made a flowy, forgiving top from my remnant instead. I looked on the internet for ideas and much in the way I would do if I was cooking a new dish, I took some tips and inspiration from all corners of the world wide web.

First I folded my fabric in half and pulled the front up a bit, because I wanted the shirt to be longer in the back than front. 
This is a sideways picture of the folded fabric. So the fold is the top, where the neck hole goes. I cut out a neckline that came down a little in the back and a little more in the front. Going down from the top two corners, I made a mark where the arm holes went and then sewed in about four inches at that point, and then turned 90 degrees to go down the rest of the shirt. I cut out the excess fabric, leaving me with kind of a misshapen T. I tried it on and took it in a few times until I achieved the most flattering level of flowiness.

Next, I folded up each sleeve once to make about a one inch cuff and sewed it in place. 
 Then I finished the edge along the neckline. 
Remember that longer back part we talked about earlier? We'll call that the "tail." Next I trimmed my tail to be nice and rounded. Achieving symmetry was a challenge. I then finished that edge as well. In this case by "finish," I mean I folded in a tiny bit and sewed, though I later realized if I folded inward twice, the frayed edge would be totally hidden--something to keep in mind for future projects.   
The last thing I did was put on my shirt and force my boyfriend to take a series of photos of me modeling my shirt. He was a real sport. 
 I like to wear it as an off-the-shoulder number. People go crazy for these creamy white shoulders. 
 Here is a side view. Check out that tail.  

This shirt rules because it's cute and mod looking, and I could eat several cheeseburgers and tons of beer while wearing it and not feel constricted or uncomfortable. I call that sewing success!   

The long and short of it is that this shirt will turn you into a motherfucking  kumquat goddess. 
 Stay tuned for the next installment of my sewing adventure, during which I get help from my mommy and learn how to use my pencil skirt pattern! 

Thursday, March 31, 2011

The Faux Vintage Apron to Infinity


Our kitchen has recently become a space rocket on a mission to uncharted culinary galaxies. From our adventures with the Fry Daddy to our attempt to recreate our favorite deli soup, we're becoming seasoned gourmonauts one recipe tweak at a time. These explorations require specialized tools and equipment, and as we delve yet further into the cosmic kitchen abyss, we must don the heavy armor necessary for the possible dangers that lie ahead.

While the vintage apron is a common and fashionable way to shield oneself from the powdery, drippy and often sticky elements of cookery, I needed something a bit sturdier for an upcoming Pan-Asian Dinner Party to End All Pan-Asian Dinner Parties. My mission was clear.
I picked up this pleated red and white striped skirt at a thrift store for about $5. I love the details and cutouts in the embroidered flowers along the edge and I think the style is befitting of a kitschy kitchen.

Next I adjusted the white balance on my camera and cut out a triangular apron shape from the skirt, along with two long skinny pieces for straps and one small bunch of flowers to adorn a pocket. Then I ironed everything. For the pocket, I cut a pocket shape out of a holey, old pair of red running shorts. I sewed back the edges on the apron and pocket. I sewed up the straps and turned them inside out.
Next I sewed back the top edge of the apron triangle and sewed on the straps, making sure they were stitched securely multiple times over. I hand sewed the pocket to the apron so that I could be sure to follow the jankity stitch along its misshapen edge perfectly. I hot glued the flower cutout to the pocket top because I didn't want extra stitches obscuring the embroidery detail.

My craftsmanship style is of the it's-supposed-to-look-like-that school of thought, and this faux vintage apron embodies that perfectly.
With this creative, one-of-a-kind, bulletproof apron, I'm ready to tackle any kitchen mission.

Stay tuned for a picture of me wearing it while prepping for our highly anticipated Pan-Asian Dinner Party!